
A quick-connect hose kit should be defined by the connection path it completes. “One set” can mean a tap adapter and one hose socket, a hose-to-nozzle pair, or a larger collection with spare washers. Those are different bills of materials. Before pricing a kit, draw the path from tap to hose to tool and assign a part number and quantity to every interface.
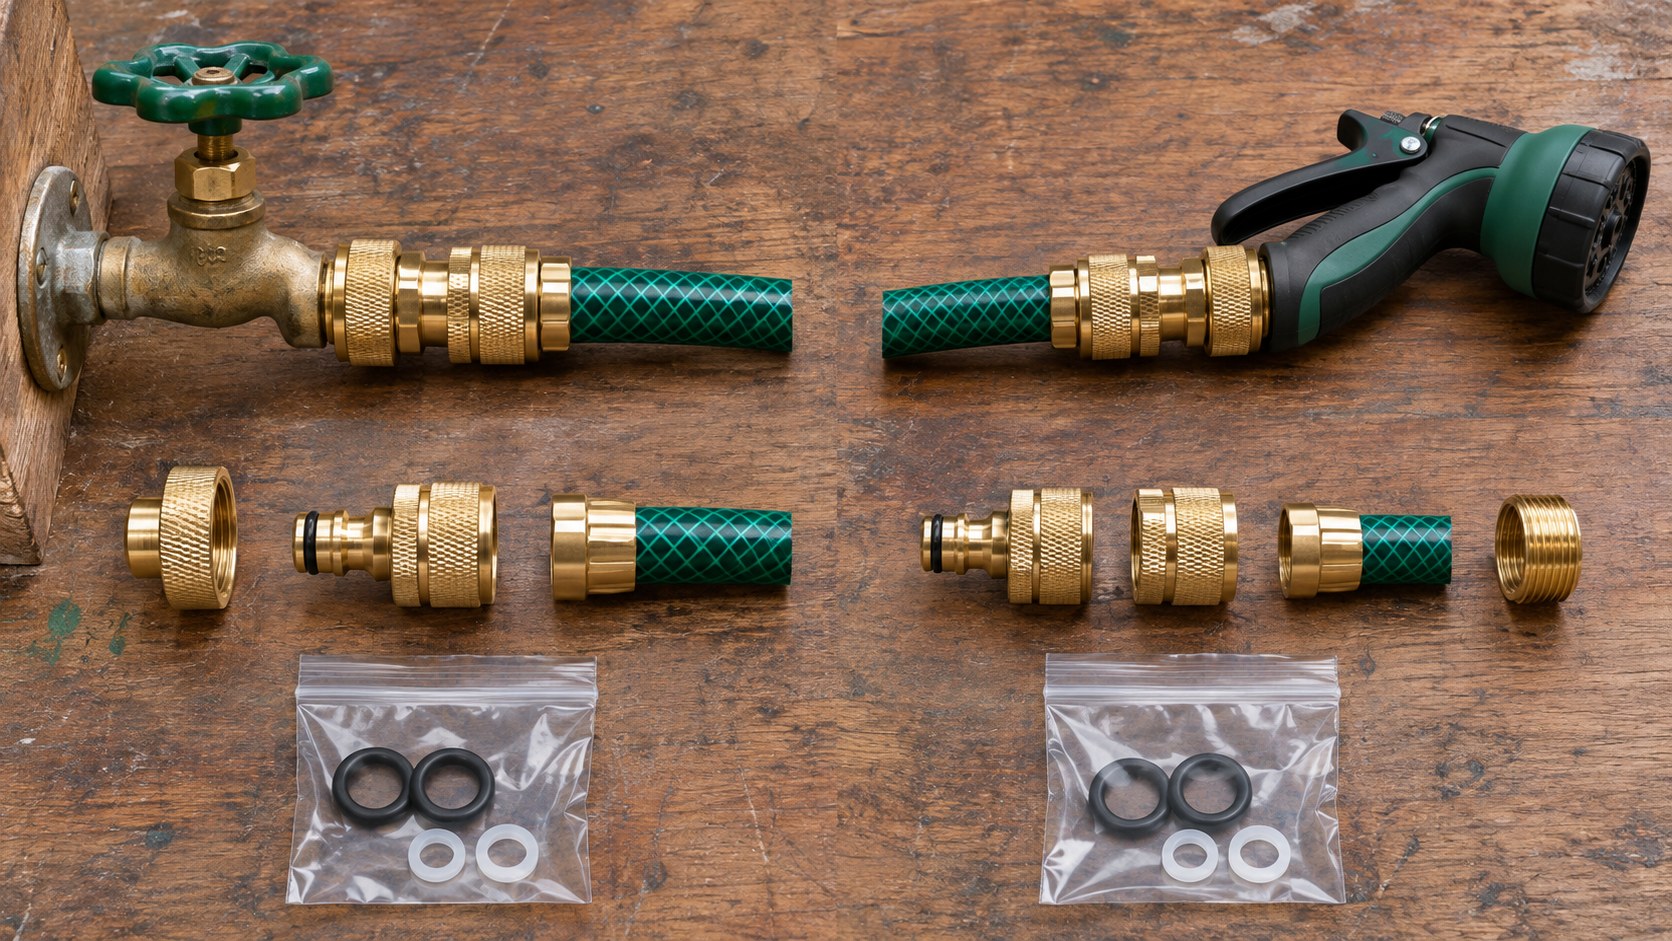
Begin at the tap
Write down the tap’s thread type and whether the kit supplies the mating adapter. Check how the threaded end seals: a flat washer in a hose coupling and a sealant-dependent pipe thread are not interchangeable instructions. If the kit is sold to more than one market, separate the market-specific adapter versions instead of relying on a broad “standard thread” label. ASME’s hose coupling thread standard describes one thread family, not every tap around the world.
Next identify the quick-connect profile on that tap adapter. The mating socket on the hose must be from the same approved system or an explicitly tested alternative. If a tap adapter is packaged alone, do not show a complete hose connection on the box without listing the additional piece the user must buy.
Follow the hose to the tool
A typical path may include a socket at the tap end of the hose and another socket at the tool end. The tool then needs a matching plug. Some kits use a water-stop socket at the tool end so flow pauses when the nozzle is removed; others use an open-flow connector. These are functional choices, not cosmetic substitutions. The hose diameter and hose-end gripping method also have to match the hose included or recommended.
Gardena’s water-stop product description explains the purpose of that feature in its own system. A Hengxin kit should use its own model-specific evidence for any water-stop claim. A package may contain the right number of brass pieces and still be unusable if one plug profile or hose grip is wrong.
Define a set and a pair in the purchase order
Write the quantity next to each item rather than assuming that “pair” always means one plug plus one socket. Some sellers call two sockets a pair because they fit two hose ends; others mean the two halves of one quick connection. State whether washers and spare O-rings are installed, bagged separately, or omitted. Count the packaging inserts and instructions as well when they are part of a retail SKU.
| Position | Decision to record | Quantity check |
|---|---|---|
| Tap | Thread, seal and quick-connect plug profile | One per intended tap |
| Hose inlet | Socket profile and hose diameter | One per hose inlet |
| Hose outlet | Open-flow or water-stop socket | One per hose outlet |
| Tool | Matching plug and tool-side thread | One per tool supplied |
| Service parts | Flat washers, O-rings, extra clamps | Specify installed and loose counts |
This is an interface checklist, not a universal recipe. A kit intended only for hose repair may not need a tap adapter or tool plug. A two-hose extension may need a different coupling. Keep the bill of materials tied to a drawing of the actual connection path.
Use a simple assembly diagram
Show the tap, hose and tool in left-to-right order with the model code under each mating half. Indicate which end of a water-stop connector faces the removable tool. Use the same codes on the carton, individual bags and replacement-parts page. If the user must push a sleeve or insert a plug until it seats, a close photo of the approved pair can reduce mistaken assembly. Avoid drawings that show parts the kit does not include.
Before approval, assemble every proposed path from production samples. Confirm the tap adapter thread, hose fit, plug/socket engagement, water-stop behavior if present, and leakage at defined conditions. A photo inventory confirms the count but cannot confirm function. Keep test records by kit revision, because changing one small seal can alter the claim printed on thousands of cartons.
Catch the mistakes at packing, not after delivery
A packing check should compare the carton contents with a signed bill of materials. Count loose seals separately from seals already fitted to connectors. Check that each bag carries the right code and that the instruction sheet matches the kit revision. For a multi-market product, verify that the tap adapter in the carton has the thread printed on the label. Weight checking may catch a missing large brass part, but it can miss one small washer; use an appropriate visual or count check for those pieces.
When a kit has several shiny, similar-looking plugs, arrange the packing tray in the same order as the assembly diagram. A photograph of the approved tray gives warehouse staff a practical reference. Keep the photo updated after any component substitution. Do not use a staged image from a prototype if production parts have changed shape or color.
Which failures belong to the kit designer?
A missing piece is an obvious packaging defect. A more subtle failure occurs when all listed pieces are present but do not connect to one another. For example, a tool plug may have a different quick-connect profile from the hose outlet socket, or a water-stop socket may be placed at the tap end when the intended user task is changing nozzles. Assemble a random finished kit as an incoming or outgoing check, not just a set of loose components.
Another common source of confusion is the photograph on the carton. If it shows a hose and nozzle that are sold separately, label the image accordingly. Buyers may otherwise count those items as part of the set. The product title, bill of materials, hero photo and instructions should describe the same contents.
Replacement parts and reorder codes
Customers lose plugs and wear seals. Give each replacement piece a code that identifies the connector system and relevant size, then state which kit SKUs use it. A generic “spare washer” listing can lead to an order that looks right but is the wrong thickness. If replacement parts are not available separately, say so before a distributor promises a service program.
For distributors, a replenishment file is often more useful than a generic “spares available” sentence. Include kit code, component code, part description, compatible revision and whether the component is sold loose or only in a pack. If a seal material changes, decide whether the new seal works with older connector bodies before retaining the same spare-part code.
A new retail customer may not know what “four-piece kit” counts. Count the adapter, plugs and sockets consistently on the front and back of the package, and say whether loose washers contribute to the piece count. This small wording decision prevents a returns discussion about a part that was never promised.
For online listings, use the same contents list as the carton. A marketplace title can be updated faster than printed packaging, which makes version drift easy. Tie both to the approved kit code and revision so that customer service can identify what was actually shipped.
When asking Hengxin for a retail kit, send a connection diagram, destination market, hose specification, target contents, spare-part policy and packaging format. The hose connector category can help identify candidate components. The contact page is the place to request a model-specific bill of materials and sample review before committing to carton artwork.